Rather than entering one case at a time, via manual data entry, you can upload many cases at once using the batch data file upload process. To do this, follow these steps:
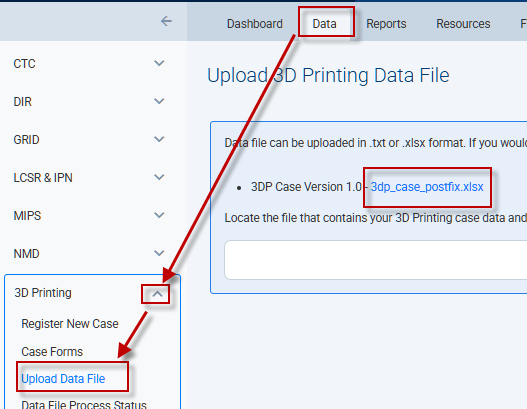
Click the Data tab in the top menu from any page in the NRDR portal.
Click the down arrow next to 3D Printing on the left menu navigation.
Click Upload Data File.
Click the 3dp_case_postfix.xlsx link. This downloads an Excel file
Fill in the Excel file with your 3D Printing data.
Note: You may upload data for multiple facilities simultaneously; however, if you leave the Facility ID blank for a row, that row will be uploaded to the Facility ID selected in the facility picker.
The template is also available for downloading below. Note that the permitted values for each column are listed in the column header. The header text is color-coded:
Red text indicates a required field.
Black text indicates an optional field.
Blue text indicates a conditionally required field. Conditionally required fields may need to be populated depending on whether another element is populated, or on the value of another element. These conditions are listed in the column header. For example: If Were there any complications attributed to the 3D model or guide? is 1-Yes, then Severity level of complications is required. Otherwise, Severity level of complications should be left blank.
Uploading the File
Once your file is ready, follow the steps on the Data File Upload Instructions page to upload the file to the registry. Be sure to check the file status to see if there are errors you need to investigate or correct.
3DP Data File Upload Template 1.0 - May 4, 2024