TABLE OF CONTENTS
- Purpose
- Steps to Upload a File
- Checking File Upload Status
- Viewing Rejected Records
- Correcting Rejected Records
Purpose
This article provides instructions for uploading a data file using the Upload Data File utility in the NRDR Portal. For registry-specific data file upload details, see the article for the individual registries: 3D Printing Registry, CTC Registry, GRID, LCSR, IPN, and NMD.
NOTE: When uploading a file, please ensure it does NOT have
1. Any formulas in the cells.
2. Any vertical bars (characters that look like this: | ) in the cells. For example, an entry like this for a study name is invalid: 2D| 3D| SCREENING
These errors will cause the file to reject and potentially not allow the log file to be accessed.
Steps to Upload a File
Log in to NRDR
Select the facility to which you wish to upload the data, using the facility picker in the upper right corner of the portal.
Note: You may upload data for multiple facilities within a single file by populating the Facility ID column in the upload file. However, Facility ID is not a required field in the data file. If the field is left blank for a given row, that row will be uploaded to the facility currently selected in the facility picker.
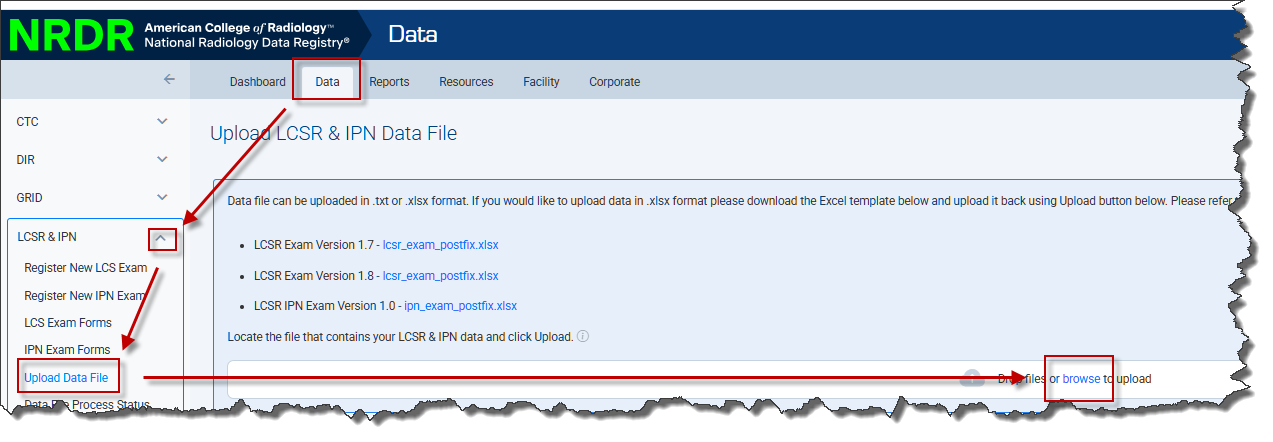
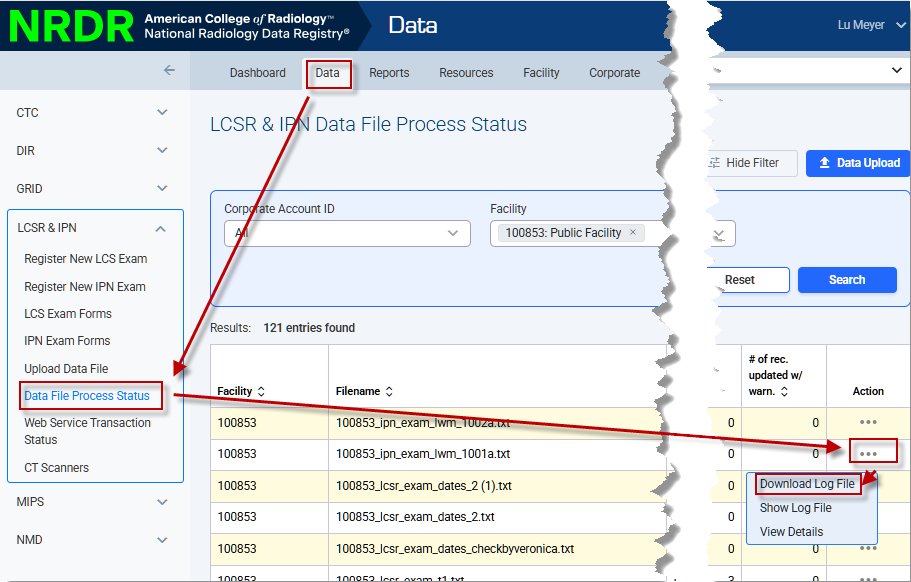
Click the Data tab in the top menu of any page in the NRDR portal.
Click the drop-down arrow next to the desired registry on the left meu.
Under the desired registry, click Upload Data File.
Click the Browse button to locate the file you want to upload or drag the file and drop it in the box shown in the LCSR example below.
A confirmation message appears stating the file has been received. If there are errors, you can either continue or cancel the upload. If you click Continue, the valid records will be uploaded. If you click Cancel, none of the records will be uploaded.
Files in xlsx format must have no more than 200,000 rows. Files in txt format must not be larger than 50 MB.
Checking File Upload Status
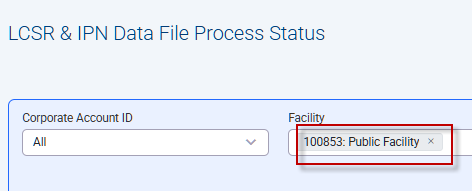
To check the status of the upload, select Data File Process Status listed under the appropriate registry on the left side of the page. By default, the page displays a table listing all files that have been submitted with at least one row matching the facility currently selected in the facility picker. You can use the facility field in the search box to generate a table for a different facility:
Note: The Upload Errors Report provides immediate feedback about file upload status for an individual facility--or for multiple facilities within the same Corporate Account. The report includes file-specific error and warning details and can be especially helpful for identifying rejected files and files with rejected records across multiple facilities.

The table includes the following columns:
| Facility | The facility for which record counts apply. Rows for other facilities included in the file are not counted. |
Filename | The name of the file, with your facility ID added to the beginning of the name. Refer to the file specification for a description of the other components of the file name. |
Received | The date and time the file was submitted to the registry, in Eastern US Time. |
Loaded | The date and time the file was added to the registry. This normally occurs during the early morning hours of the day after the file was received. |
Status | The status of the file, indicated as one of the following:
|
# of records in file | The number of records read from the file for the facility. |
# of records rejected | The number of invalid records. These records were not added to or updated in the database. You can view a list of rejected records with reasons for rejections by clicking Download Log File or Show Log File in the Action column.Note: When you upload your file, the column header row will be rejected as an invalid record. This is expected; consequently, all uploads with column headers will have at least one rejected record |
# of records added | The number of records that were added to the registry database. |
# of recordsadded withwarning | The number of records that were added to the registry database, but are missing the additional data element(s) necessary for a complete record. |
# of records updated | The number of records that were updated in the registry database. No history of changes to updated records is retained. |
# of recordsupdated withwarning | The number of records that were updated in the registry database, but are missing the additional data element(s) necessary for a complete record.. No history of changes to updated records is retained. |
Action | Links for viewing or downloading a log file, and for viewing details of how many records were processed for each facility ID within a file. Clicking on the ellipsis opens the available options: |

You can restrict the list of files by using the search filter that appears at the top of the page.
Viewing Rejected Records
You can view rejected records by clicking these links:
The example above is for LCSR files submitted using the data file upload function, but the process is the same for other registries, and for files submitted using web services. The log file is an Excel spreadsheet with fields in error framed in red or yellow, along with a comment showing the error. You must click Enable editing at the top of the spreadsheet to see the comments.
 A red frame indicates an error that caused the record to be rejected, while a yellow frame indicates an error that generated a warning. Unlike records with errors, records with warnings only are added to the database. For example:

If you uploaded a file that has rejected records, you will see as many as four links in the Action column that you can use to display the reasons for which the records were rejected:
Download Log File | Use this link to create a file of rejected records and the reasons for rejection. The file can be saved for future viewing with a software application such as Microsoft Excel. The columns in the file are delimited with a | (vertical bar). |
Show Log File | Use this link to view rejected records and the reasons for rejection online, as shown in the NMD registry example, below. (Note: Please allow pop-ups for the NRDR site if you cannot view the log file) |
Generate Log File | For larger file submissions, this option is available for a log file to be generated in the background as you continue to work with the NRDR portal. You will receive a notification if still in the portal (or via email notification if not) that the log file can be downloaded and reviewed. |
View Details | Shows the summary of the file with record counts and status, helpful for submissions with multiple facilities. |
Some errors are detected as soon as you upload your file. Others are not detected until the file is processed, resulting in a file status of either Successful or Rejected. Files are normally processed overnight, but may take up to 72 hours to process.
Correcting Rejected Records
See Upload Log Files to NRDR Registries.
For invalid patient ID errors, see also Resolving "Invalid. Cannot update / create patient" Errors .
 | Previous: Manual Data Entry | Next: Web-based Data Transmission |  |