
TABLE OF CONTENTS
Purpose
This article suggests resources you should consult before entering data into the online forms available in the NRDR Portal (for the 3D Printing , CTC, GRID, LCSR and IPN registries) and provides instructions for using the forms' features.
Registry Specific Resources
Data submission articles: Refer to each registry’s data submission articles for details about registry-specific data entry processes, e.g., data that must be entered in a specific order: 3D Printing Registry Data Submission Overview, GRID Data Submission Overview, LCSR Data Submission Overview, and CTC Registry Data Submission Overview.
PDF forms: Complete a hardcopy version of the forms before entering data online to ensure all data are collected and to provide an opportunity to identify errors during the data entry process. Obtain PDF versions of the forms at: GRID Forms, LCSR Forms and CTC Forms. The 3D Printing form includes several dropdown menus, making the use of PDF forms impractical.
Data dictionaries: Learn more about a form's data elements by reviewing the respective registry data dictionary: 3D Printing Data Dictionary, GRID Data Dictionary, LCSR & IPN Data Dictionary and CTC Data Dictionary.
Entering Data into the Online Forms
Once data have been recorded on hardcopy forms, begin online data entry in the NRDR Portal by opening the online version of the forms in a registry’s Data Collection menu.
Navigation Instructions
Throughout NRDR Submit refers to the action you take when you have completed data entry for a form and you want the entries to be recorded in the registry. Save refers to the action you take when you have partially completed a form and you want to continue data entry at a later date. The entries made prior to the Save action will appear on the form when you continue data entry, but they will not be recorded in the registry until you perform the Submit action. You also perform the Save action when you want to make changes to a previously submitted form.
Do not use the Back button on your browser to navigate to a form; doing so will prevent your data from being stored in the database. Always use the Data Collection menu items to navigate to a form.
For security purposes, your session will terminate automatically after 20 minutes of inactivity. Any entries you may have made since clicking the Save button will be lost.
Saving a Partially Completed Form
If you want to save a partially completed form, click the Save button at the bottom of the page. You will be able to continue entering data at a later time.
If you end your session without clicking the Save button, or without correcting errors after clicking the Submit button, your entries will be lost.
For security purposes, your session will terminate automatically after 20 minutes of inactivity. Any entries you may have made since clicking the Save button will be lost.
Finding a Form
To find a form that has already been saved or submitted go to the Data tab in the top navigation menu, go to the Left menu, select the Registry, click on the form you are searching for. Enter the information into the fields and click Search.
Note: Fields may differ depending on the registry and form. The below example is from the GRIG registry.
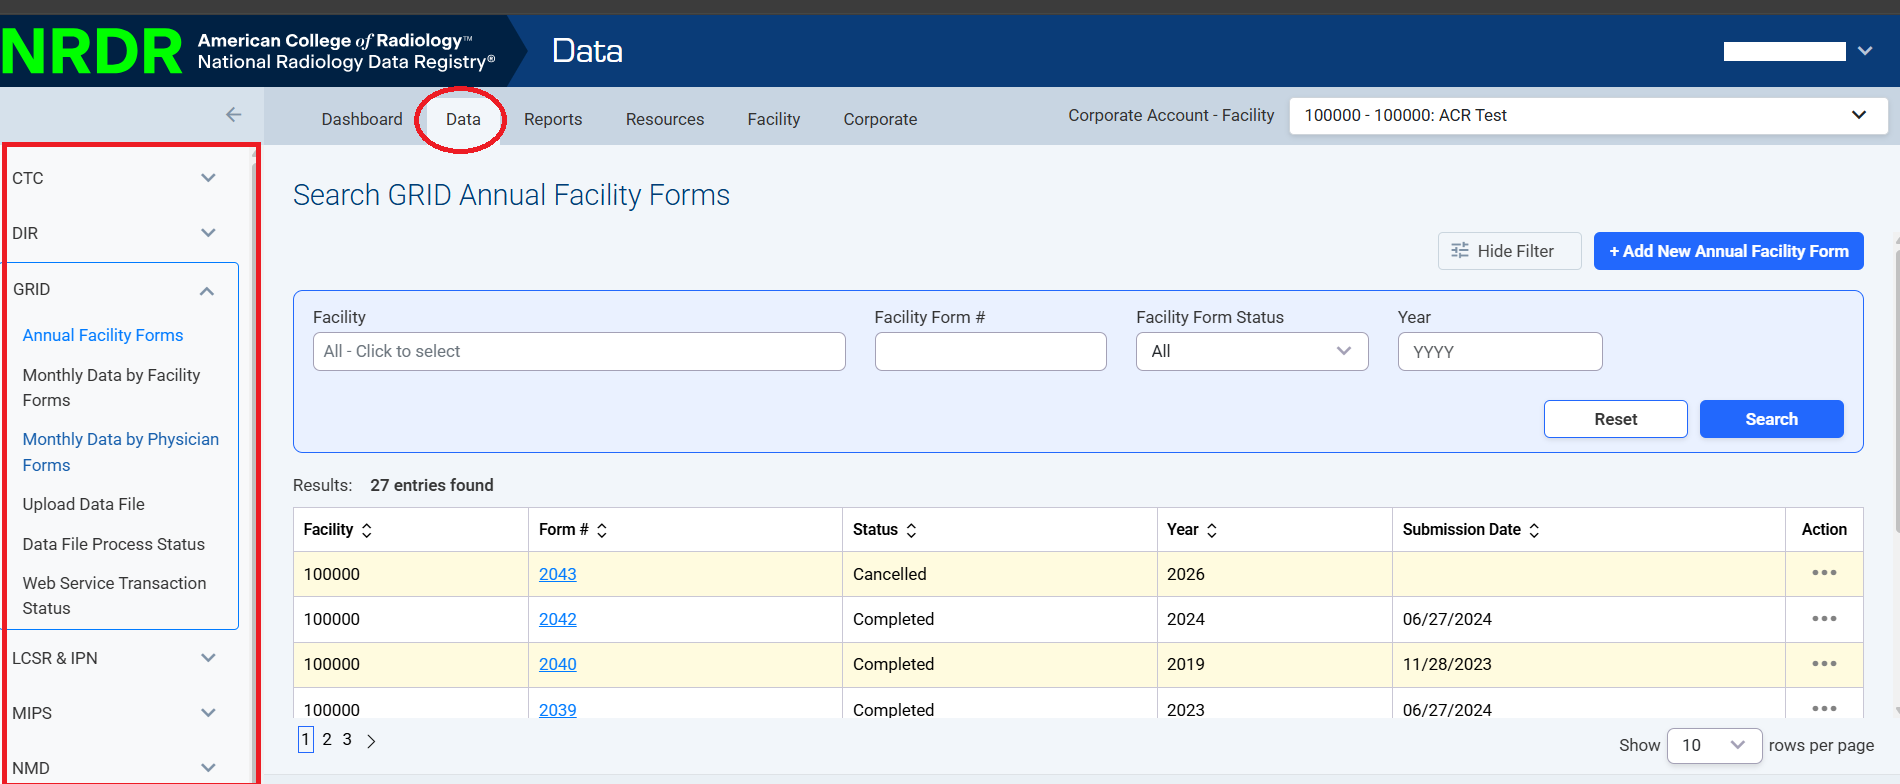
Use the filter to find records by status, as well as other criteria.
Click Search to retrieve a list of forms matching your search criteria. You can also click Reset to clear the search fields and start again. Click the number in the first column to view a specific form.
Editing a Form
You may edit forms not marked as Cancelled. A cancelled form must first be restored before it can be edited.
To make changes to a form, follow the process described in the Finding a Form section above, and click on the Form number in the second column to open the desired record. Make your changes and then scroll to the bottom and click Update to complete the form.
You must enter comments if you change data for a form with the status of Submitted or Completed, or if you cancel or restore a form before you can save or submit the changes. Saving changes to a previously submitted form updates the data for the existing form and does not create a new registry entry.

Note: The system does not save historical data. Once you save a form with changes, the values that were previously in the edited fields are lost.
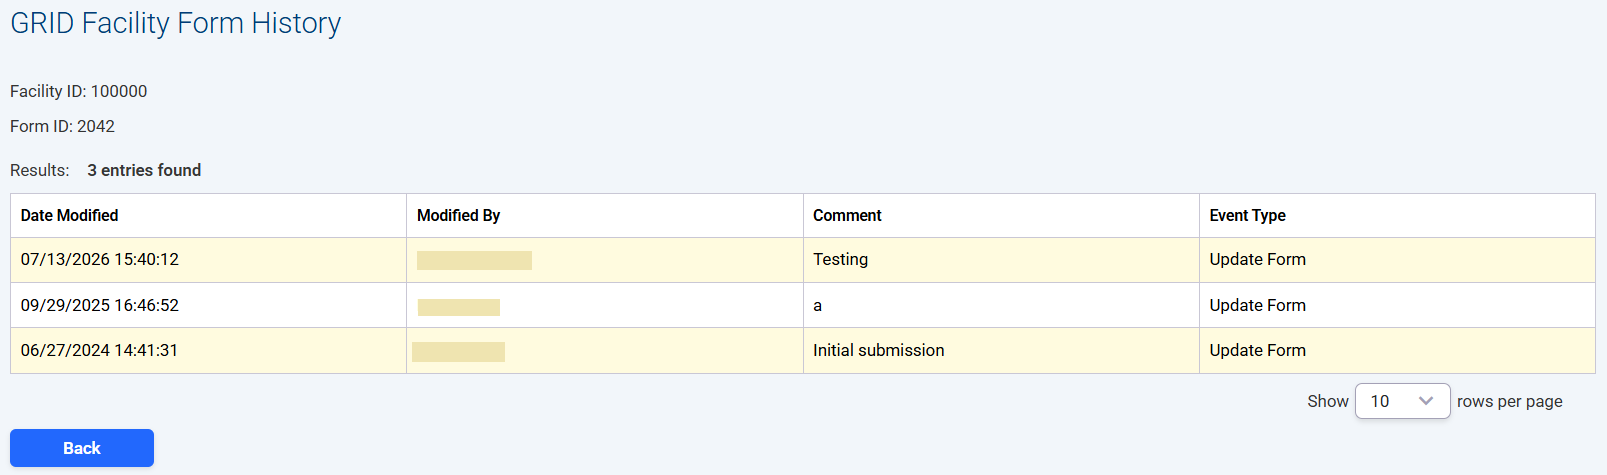
When you make a change to a form that has previously been submitted, the system saves your name, the date the change was made, and the corresponding comment. You can click the History button at the bottom of the page to view information about previous changes.

Canceling and Restoring a Form
To cancel a form, click the three dots in the rightmost column of the form list > click cancel.

Note: Some forms have dependencies that may prohibit cancellation. Refer to the registry-specific Manual Data Entry articles for more information.
If you cancel a form in error, you can restore it by searching for the form, clicking the three dots in the rightmost column of the form list, then click Restore.

Note: For information about canceling and restoring a form with the new user interface available for GRID, check out the article Manual Entry: Cancel or Restore a Case Form
| Next: Data File Uploads |  |